Documentation
Welcome to MasterMS guide ! Take some time and learn our custom game features


Welcome to MasterMS guide ! Take some time and learn our custom game features

Welcome to MasterMS. This guide was created by the community to give new players an introduction into the features that can be found on this custom server. It can also be used as a reference in the future, when you might get stuck in your journey. Our players have compiled as much detail as possible into one guide to create a better understanding for our new and long time players. We hope you find everything you’re looking for in this all-in-one comprehensive guide. If there is something missing, please feel free to reach out to one of our staff members.
Before getting started, there are a few things that we will need to do. We’ve created a checklist for you below, to follow along with. It should help with the installation process.
You will need to download one of these setup packages. These packages contain the files to play on the server. Once you have done that, you will need to download the client/launcher.

|
Discord |
|
|
Mega |
|
|
1fichier |

|
Client/Launcher |
When that’s finished downloading, extract the files to a directory of choice and double-click on ~MasterMS. Once the program is open, click on the update button to download all the latest files, this shouldn’t take long.

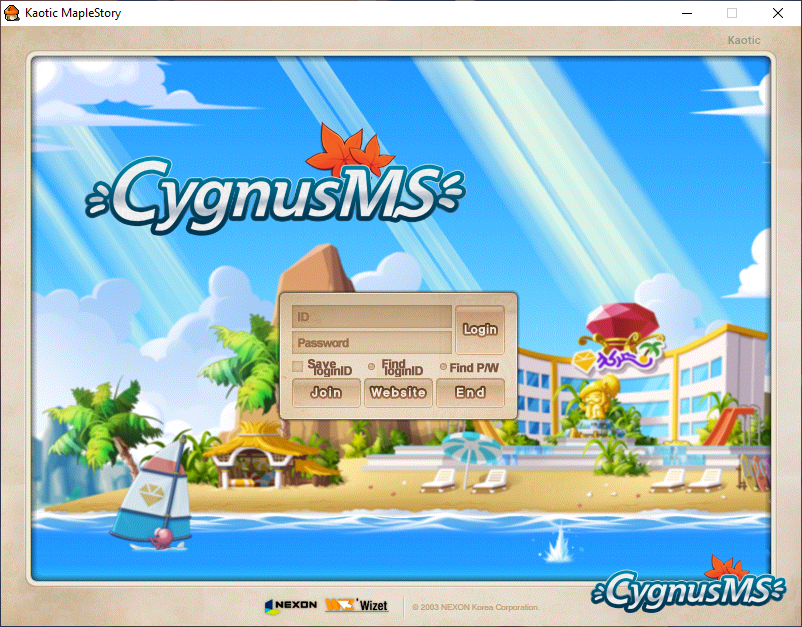
Now that you’ve updated these files, you’ll need to create an account to play. You can click the play now button to continue. Alternatively, you can launch the program in the directory named MSK.exe. It will launch and load the login screen. You can now create an account. Let’s go!
|
Attention! The server has auto registration enabled. Please remember to write down your username and password, so you won’t forget it in the future. |
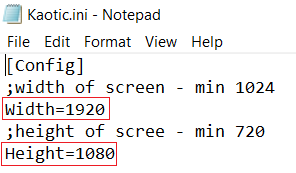
Edit the kaotic.ini file to change the in-game resolution. Once you’re in-game, you can click on the System button, then system options, and set the resolution to 1024x768.
You can create an account using the game login screen. Simply enter your desired ID and Password. If you receive an error message, it could mean that your desired ID has been taken, please try again, with a different ID. If you still encounter an error, please contact the staff.
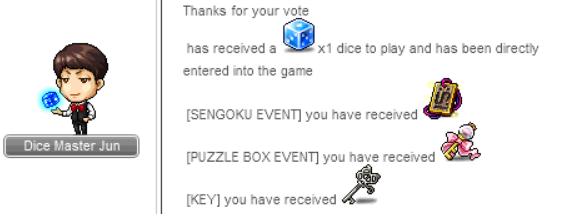
You can vote up to 4 times a day using a VPN. The first vote of a new day will give you the following rewards; Game Die, Sengoku Class One Day Pass, Hero’s Key and a Silver Key. Each subsequent vote will reward you with 1 Game Die. Use the @vote command to open the voting window. Alternatively, you can visit with Dice Master Jun in the Free Market. Select “Retrieve link to vote” to open the voting link that has been personalised for you. We often encourage users to bookmark the link for convenience.

When you have finished voting, select “Claim Votes” to collect your voting rewards.
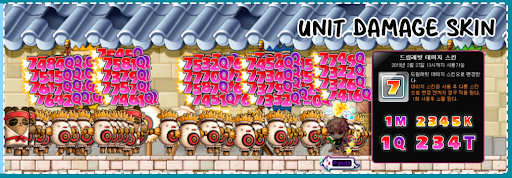
We have implemented a new damage unit skin that shows your actual damage with units instead of just 1s. The use of damage skins has been disabled until it can be integrated with the new damage unit skin. Use the @unitdamage command to select how you want your damage numbers to be displayed.
We reserve all rights to change and/or modify the rules as we see fit. Amending, adding, or removing certain rules that have been deemed necessary by the staff at MasterMS. Any relevant changes will be notified through our discord server. Our server rules serve as a warning and we reserve the right to permanently ban anyone breaking the rules and/or exploiting any system in or out of the game.
For more information visit:
https://forum.master-ms.com/threads/rules-reglas.46/
Do you have any questions for us? Be sure to double check our Frequently Asked Questions channel in our discord. You might find someone has already answered the question that you are inquiring about, or just stop in to say hello! We’re happy to answer any questions you have.
Donations are not required, but are greatly appreciated. Funds are put back into the cost of running the server and the associated costs with running the operation. For more in depth information regarding how to donate, donations and rewards, please visit the following link:
Before selecting a class, we want to inform you about a custom skill we’ve added to some classes, called Final Attack. Final Attack is a skill that can trigger up to 15 hits on 10 targets when a skill such as triple throw, hits a monster. Final Attack is added to balance skills with low areas of effect or are slow by themselves. Final Attack can be located in the beginner skill tab.
The following classes can obtain Final Attack. However, some classes have been excluded.

|
|
|
Excluded |
|
|
Attention! The evan class has a slightly different version of Final Attack. |
Now that you know about the custom skill, Final Attack, you can choose from a wide range of characters at the custom character creation screen that might fit your gameplay. Here is a list of available classes at the moment. (Might be subject to change in the future.)
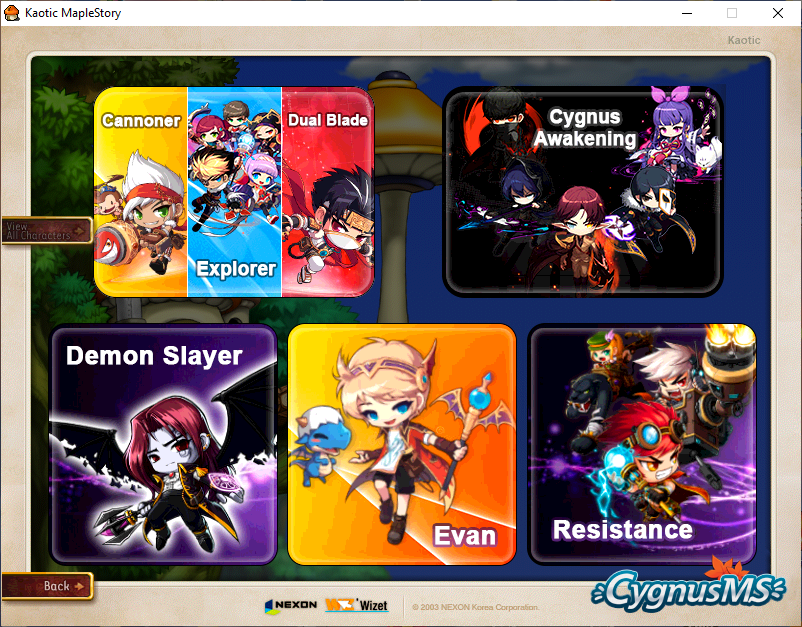
| Explorer |
|
|---|---|
| Cygnus Awakening |
|
| Resistance |
|
| Evan | |
| Demon Slayer |
|
Attention! We apologise, the Aran and Mercedes classes are currently unavailable. |
All rates are set to 1x. As you progress in your journey, you will earn bonuses that will increase the rate of each stat up to 1000x. The stats that can be increased are as follows; Experience, Meso, Drop, All Stats, Overpower, Total Damage, Boss Damage, Ignore Defence, Kaotic Damage. For more in depth information regarding how to increase these stats, please scroll down to the Bonus Progression section.
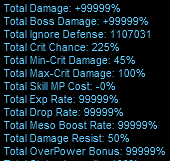
(This image captures the stats of a player that has been playing for a little while.)
The maximum level a user can achieve on each character is level 100,000. This may change in the future. You will aim to reach level 9999, at first. After that, you will have to obtain all of the achievements and defeat the black mage.
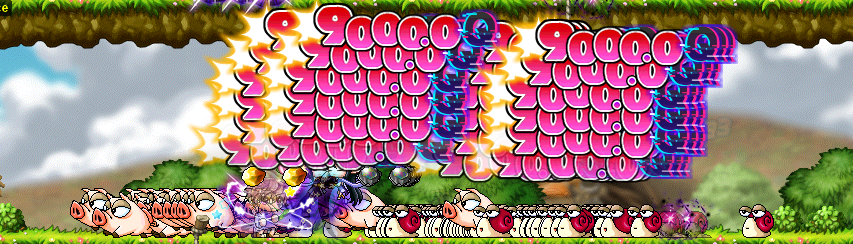
The damage cap is 9,000,000,000,000,000,000,000 (9000 Quadrillion). The damage cap can be raised up to 9,000 Quadrillion with the Kaotic Damage (KD) bonus. Damage lines shown are simplified.
You’ve probably already noticed that monsters don’t drop equipment, items or mesos on the ground. That’s because they go directly into your inventory and the overflow inventory.
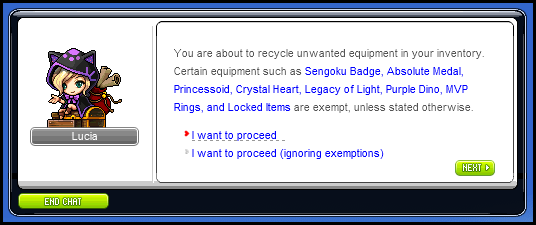
Equipment is automagically placed into the players inventory. In the event that your equipment inventory is full, you can automatically recycle unwanted items that have dropped and turn them into currencies, such as; Unleashed Coins and Maple Points.
These currencies will be used to spend on consumables to upgrade your equipment.
Items are automagically placed into the player's inventory, with the exception of ETC categorised items. However, they can be extracted from the overflow inventory.
Mesos are automagically placed into the player’s meso inventory. The maximum amount of meso that can be obtained in the inventory is 2,147,483,647. Meso obtained that has exceeded the maximum amount, will be placed in storage for withdrawal in the future.
The overflow inventory is designed to store large amounts of ETC items. It is globally accessible throughout the user’s account. That means, you can access the inventory, on every other character that has been created.
You are getting one-hit due to the high level difference between your character and the monster. You can use the @monster command to view the monster level. The Weapon Defence and Magic Defence stats on equipment do not make a significant difference, upgrading to better equipment will not help prevent instant death. Here are the best possible solutions:
You might come across some abbreviations you don’t understand. Don’t worry, because we've created a quick list to understand them. Here are some common abbreviations that are used in this guide and in game.
| KD | Kaotic Damage |
| DP | Donation Point |
| GMB | Golden Meso Bag |
| GML | Golden Maple Leaf |
| OC | Oda Coin |
| LS | Life Scroll |
| GGT | Golden Gachapon Ticket (It’s called Gachapon for Net Cafe in game.) |
| MPC | Monster Park Coin |
| EES | Equipment Enhancement Scroll |
| IED | Ignore Enemy Defence |
| LMC | Legends Maple Coin |
Here is a quick glance at some of the features that you can expect to find.
Now in MasterMS you will be able to leave your character attacking automatically.
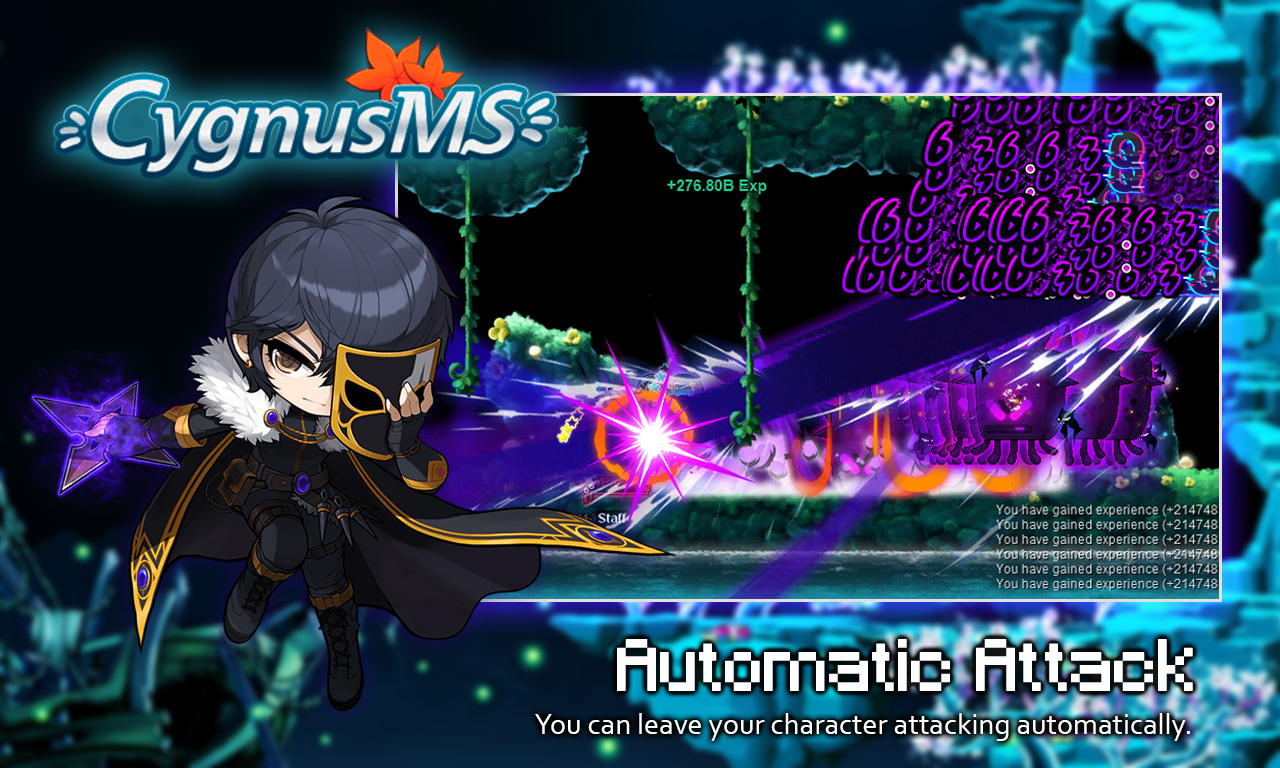
For more information visit: https://forum.master-ms.com/threads/automatic-attack.132/

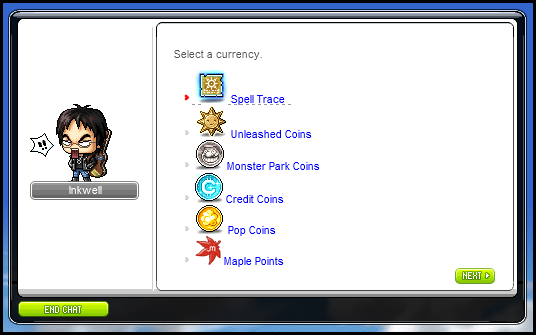
There are a few currencies in-game. Here is a list of them, with a detailed explanation.
 Mesos
Mesos Oda Coin
 Golden Meso Bag
 Unity Heart
 Golden Maple Leaf
 Donation Point
 Maple Point
 Pop Coin
 Credit
 Monster Park Commemorative Coin
 Unleashed Coin
 Gachapon for net cafe
Alias: Golden Gachapon Ticket
 Life Scroll
 Legends Maple Coin
 Spell Trace
Useful commands that can be used in game.
To see more commands, click on the following link : Click Here
| Command | Description |
|---|---|
| @job | Advance job (only Explorers at level 30) |
| @ap | Add Ability Points to stats |
| @training | Teleport to training areas suitable for your level |
| @loot | Toggle auto-recycling of equipment loot (does not affect Purple Dino) |
| @effect | Toggle viewing of skill effects of other players |
| @vote | Open the voting window |
| @help | Shows the list of server commands |
| @time | Shows the current server date, time & event. |
| @instance | Enter a 12 hr instanced version of your current map. Requires a party. Prevents disturbance from other players. Elite Bosses will not spawn. |
| @say | Send a global message (i.e. all users can read it) |
| @stats | Shows your character stats |
| @op | Shows your character’s damage range |
| @storeetc | Stores all everything in your inventory’s ETC Tab into Overflow |
| @achievement | Open the Achievements window |
| @bonus | Shows your account bonuses |
| @qbonus | Shows your quest bonuses |
| @abonus | Shows your achievement bonuses |
| @link | Shows your link bonuses |
| @monster | Shows the monster information of your current map |
| @mobinfo | Shows the monster drops of your current map |
| @fix | Fix being unable to interact with NPCs and portals |
| Shows pending messages or event notifications | |
| @who | Shows the users connected on the server. |
| @recycle | Open the recycle window. Useful for quick emptying of inventory Equip tab. |
| @whodrops | Search for which monster or boss drops the item |
| @boss | Open the teleport to bosses window |
| @missions | Open the daily missions window |
| @cb | Open a chalkboard with the desired message (Requires a chalkboard) |
| @slow |
Decreases your speed to a minimum |
| @unitdamage | Open the simplified damage selection window |
| @kd | Allows you to see your character's KD Points and damage |
| @at | Allows you to automatically attack a mob or boss. Requires having the skill you want to use in the Ctrl key (the use of this command has an additional fee at any PQ) |
| @atmove | Allows the character to move to a mob or boss horizontally and attack automatically (does not apply to mobs or bosses that are on other platforms, higher or lower; the use of this command has an additional fee at any PQ) |
| @stop | Allows you to disable the automatic attack of the @at and @atmovecommand |
| @donate | Allows you to view the donation options |
| @storechair | Allows you to save our chairs from our Set-Up inventory in a hidden inventory (Overflow) |
| @chair | Allows you to view the hidden inventory of Set-Up items |
| @box or @marvel | Allows you to enter the options menu to open boxes or claim prizes from boxes |
| @awards | Allows you to claim Marvel Machine prizes |
Clicking on the cash shop button located at the bottom of your screen will open the basic store. Items listed for sale in the store can be bought using meso and monster park coins. There are three tabs selling commonly used items.


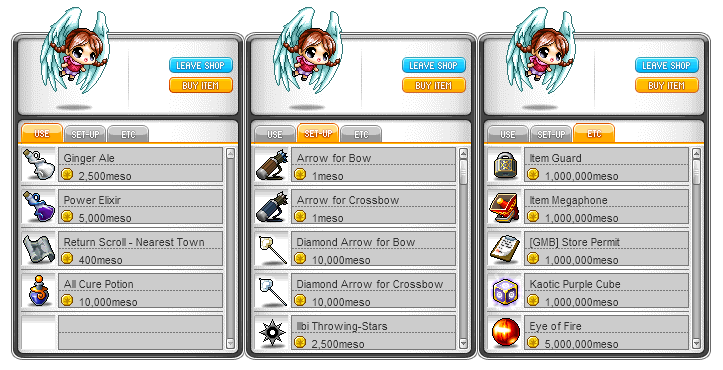
|
Attention!
|

Barry.
Clicking on the DP LAND button will move you to donation point land, clicking on it a second time will move you to Free Market. The free market is where most players gather and trade items and donation point land is home to various goods and services.


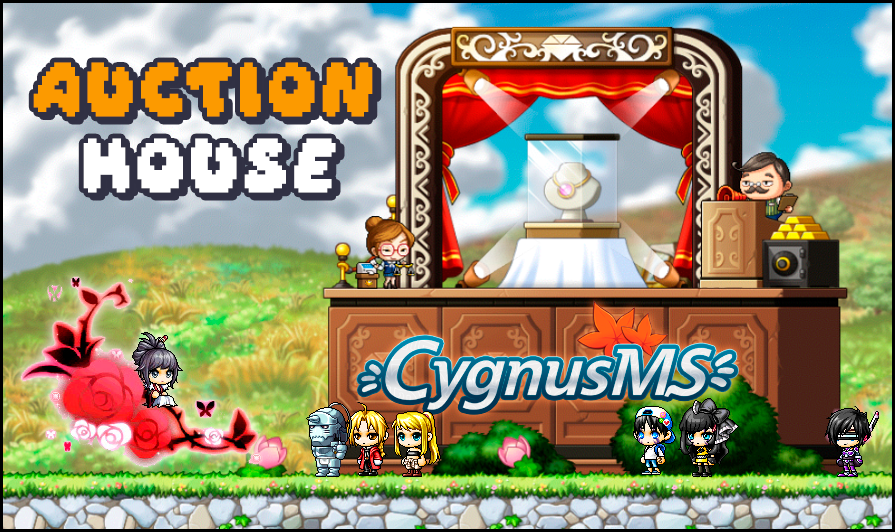
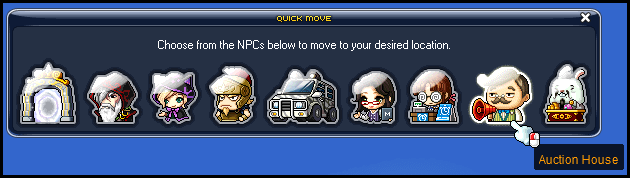
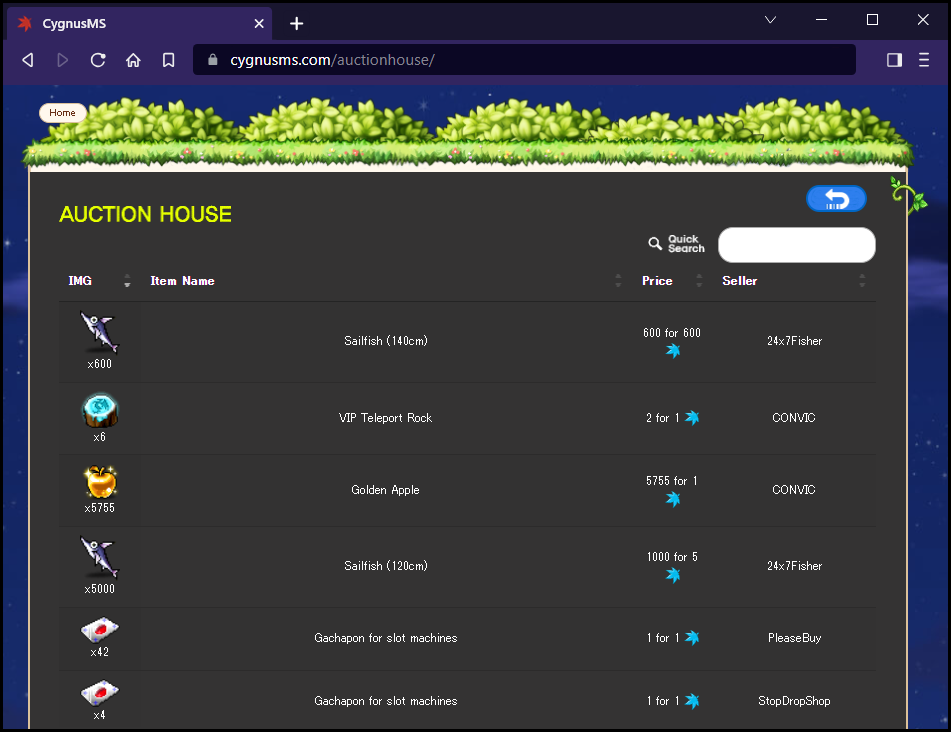
In Auction House you will be able to see all the items freely sold by users in their Personal Stores within the game. You can go there via "Quick Move", then by clicking on "Auction House" in the game menu.
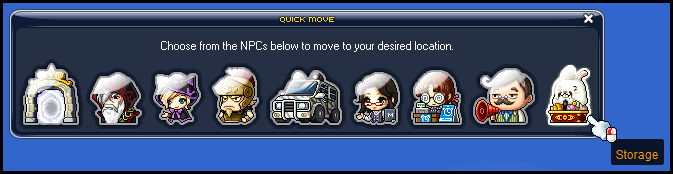
Clicking on the move quickly button under your minimap opens the Quick Move menu with nine commonly used NPC’s. It is unlocked at level 15. You will be using this feature a lot.


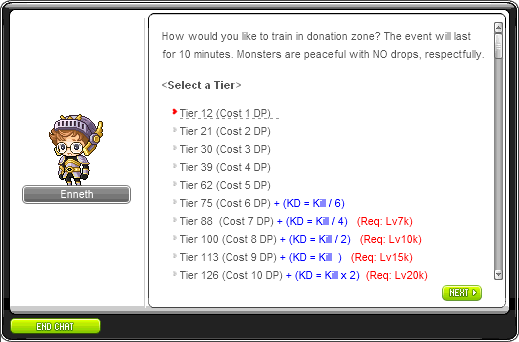
DP Dungeon is a solo dungeon. You will have 10 minutes to defeat monsters that repeatedly spawn. Monsters that spawn are 1.1x the character’s level upon entry. In this event, monsters don’t do damage. DP Dungeon is the fastest method of levelling as it provides the highest tier of monsters in the server. To get started, talk to Enneth in DP Land. You will be required to pay an entrance fee, and the cost varies with the selected monster. It is recommended to attempt the DP Dungeon during the plus one tier event on Sundays to maximise the experience gained. Monsters in DP Dungeon do not drop loot or meso.

Enneth.
Be warned that selecting a monster tier instantly begins the run, there is no confirmation screen. It is also recommended to have a high exp rate and capped damage dealt per final attack hit before attempting.
To visit the DP Dungeon, click the trade button twice > and talk to Enneth.
DP Land is a place to use donation points. All content in here is donation point related. You can access DP Land through the 7-Eleven portal in the free market. You can also double click on the trade button.
List of NPCs in DP Land:

You must speak to Cony to obtain random NX items, from a list of items. The list will update once every two hours. Stats on items range from 250,000 - 320,000 attack stat.
cost: 5 donation points per roll.

You must speak to Brown to cube the equipment. Select the specific potential you wish to have, and the NPC will only generate that potential specifically. So, if you have selected M.Att, it will only roll M.Att potentials.
cost: 5 donation points per cube.

You must speak to The Great Gachapierrot to open the Silver Box and Gold Box. You can obtain keys and boxes as prizes from various Events and Mini Games. It explains how to use a specific key on the respective box.
cost: -

You must speak to Abbes to select a chair of your choice.
cost: 5 donation points.

You must speak to Kelm to get a random non-NX item with 250 slots (weapons, clothes, accessories). The stats on these items range from 250,000 to 320,000.
cost: 5 donation points.

You must speak to Haku to obtain a 5% random bonus stat.
cost: 1 donation point.

You must speak to Haruaki to obtain a random Chat NX or Label NX ring with premium stats. The stats range from 350,000 - 450,000 attack stat.
cost: 15 donation points each roll. Refreshing the list will cost 5 donation points.

You must speak to Little Suzy to purchase facial expressions. (emojis)
cost: 10 donation points each emoji.

You must speak to Kanna to purchase items from the store such as totems, VIP teleport rock, anvils, chest keys and much more.

You must speak to Eka to get a random pet, and also to change the name of your pet.
cost: 5 donation points.

You must speak to Claw Machine to open silver and gold boxes, you will be given a link to play the minigame. For the Premium Silver Box, you will be given a link to play the Marvel Machine.
It is used to play and claim prizes in the mini game, The Claw. It also allows the use of saddle and saddle tickets.
You must speak to Enneth to enter the DP Dungeon. It comes with different tiers, up to tier 20. Check out the DP Dungeon section for more information.
cost: The cost varies based on each tier.

You must speak to Riman to purchase buffs (EXP, drop, meso and more). It comes with different tiers, up to tier 20.
cost: The cost varies based on each tier.

You must speak to Hayato to teleport your character to the Sengoku School lobby. You can also use the quick move option instead. You’ll need to have a Sengoku pass in your inventory to teleport.
cost: none.

You must speak to Blaster to exchange silver master keys to gold or premium silver keys.
cost: -

You must speak to Angelic Buster to purchase fame. It costs 300 Golden Meso Bags or 1DP per fame.
cost: 300 golden meso gags or 1 donation point.

You must speak to, Versalian Grandmaster to change your android’s appearance. It randomly changes the skin colour, hairstyle and face of your android.
cost: 1 donation point each attempt.

You must speak to Yurian to purchase a Princessroid.
cost: 25 donation points per android.

You must speak to Thunderhammer to use anvils on an item. The anvil that you choose to use must be in your inventory before you can use this feature.
cost: -

You must speak to Modryn to purchase an NX item of choice. They will roll random stats on the NX item you choose. Please be advised that there is a small possibility that it can come with no stats at all.
cost: 1 donation point per item.

You must speak to Garnet to open the Premium Gold Box and receive an Absolute Power Medal. The stats on the medal range from 5 million to 6.4 million attack stat.

You must speak to
cost: 1 donation point per ring.

You must speak to
IMPORTANT: If you wish to reuse your previous character name, you must wait until the server is restarted, otherwise you will not be able to enter your characters.
cost: 25 donation point per coupon.
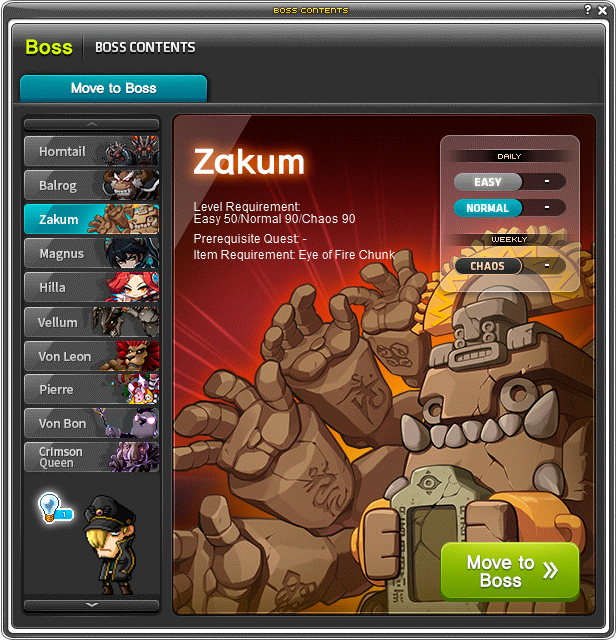
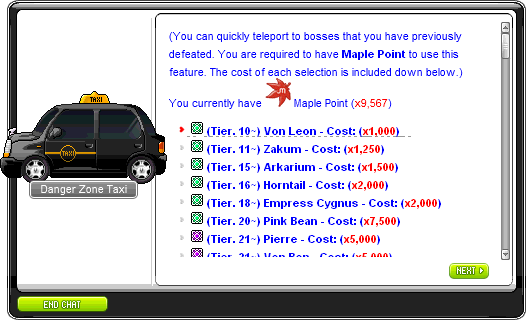
Killing bosses grants the players equipment drops, scrolls and bonuses. Players will have to walk to bosses when killing them for the first time. After killing them once and unlocking the achievement, players will be able to use the @boss command to teleport to the boss map for a small fee (Maple Points).
Alternatively, you can also use the @boss command to go directly to the map for a certain amount of Maple Point (you can also talk to the NPC Danger Zone Taxi, located in the Free Market).
|
Zakum 
|
Map: Requirements: Key: Materials for Key: Key NPC: NPC Map: Notable Drops: Boss Level: Boss HP: |
El Nath - Entrance to Zakum Altar - Eye Of Fire 5m Meso or 2000 Maple Point - - Zakum Helm 250 77 Billion |
|---|---|---|
|
How to go there: Quick Move > Mirror > El Nath > Danger Zone Taxi > Jeff > Head right to the end > Adobies |
||
|
Von Leon 
|
Map: Requirements: Key: Materials for Key: Key NPC: NPC Map: Notable Drops: Boss Level: Boss HP: |
Lionheart Castle - Von Chamber - - - - - Von Leon Equipment 500 1.5 Trillion |
|---|---|---|
|
How to go there: Quick Move > Mirror > Temple of Time > Middle Door > Lionheart Castle > Head right to the Central Tower > Top portal |
||
|
Arkarium 
|
Map: Requirements: Key: Materials for Key: Key NPC: NPC Map: Notable Drops: Boss Level: Boss HP: |
Hidden Street - Temple Ruins Boss Entry *You need to defeat Von Leon - - - - Rex’s Earrings 500 4.6 Trillion |
|---|---|---|
|
How to go there: Quick Move > Mirror > Temple of Time > Head right to the end |
||
|
Empress Cygnus 
|
Map: Requirements: Key: Materials for Key: Key NPC: NPC Map: Notable Drops: Boss Level: Boss HP: |
KSH - Empress Garden - - - Another Informant Knight Stronghold - Cygnus Garden Empress Equipment 750 12.6 Trillion |
|---|---|---|
|
How to go there: Quick Move > Mirror > Future Henesys > Left portal to Dark Spore Hill > Head down and right to the end |
||
|
Horntail 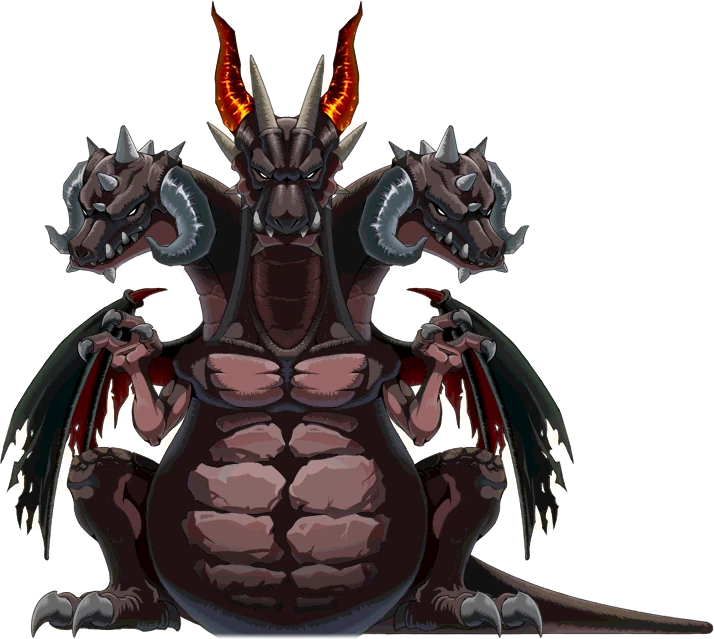
|
Map: Requirements: Key: Materials for Key: Key NPC: NPC Map: Notable Drops: Boss Level: Boss HP: |
Leafre - Cave of Life *You need to defeat Zakum Dragon’s Essence Dragon Spirit x 2500 Frightening Marble Hidden portal at the bottom right of Nest of a Dead Dragon - 400 21 Trillion |
|---|---|---|
|
How to go there: Move Quickly > Leafre > Danger Zone Taxi > Head right to Cave of Life Entrance > Moira > Keroben |
||
|
Pink Bean 
|
Map: Requirements: Key: Materials for Key: Key NPC: NPC Map: Notable Drops: Boss Level: Boss HP: |
Deep Place of Temple - Forgotten Twilight *You need to defeat Horntail Marble of Chaos (Not consumed) Smiley Mask x999 Temple Keeper Temple of Time: Three Doors Timeless Equipment 400 895 Billion |
|---|---|---|
|
How to go there: Quick Move > Mirror > Temple of Time > Right Door > Right Door > Head right to the end |
||
|
Chaos Pink Bean
|
Map: Requirements: Key: Materials for Key: Key NPC: NPC Map: Notable Drops: Boss Level: Boss HP: |
Deep Place of Temple - Forgotten Twilight *You need to defeat Horntail Marble of Chaos (Not consumed) Smiley Mask x999 Temple Keeper Temple of Time: Three Doors Timeless Equipment 1050 29.4 Trillion |
|---|---|---|
|
How to go there: Quick Move > Mirror > Temple of Time > Right Door > Right Door > Head right to the end |
||
|
Vellum 
|
Map: Requirements: Key: Materials for Key: Key NPC: NPC Map: Notable Drops: Boss Level: Boss HP: |
Root Abyss - Deepest Cave - Gnarled Wooden Key Precious Powder x 1000 Havis Keymaker Root Abyss: Abyss Chamber CRA Equipment 750 32.3 Trillion |
|---|---|---|
|
How to go there: Quick Move > Mirror > Temple of Time > Portal to Root Abyss > Portal 4 > Head right to the end |
||
|
Magnus 
|
Map: Requirements: Key: Materials for Key: Key NPC: NPC Map: Notable Drops:
Boss HP: |
Tyrant’s Castle: Heliseum Heights Entry - Steel Door Key Spell Trace x1 Havis Root Abyss: Colossal Root Tyrant Equipment 1900 752.6 Trillion |
|---|---|---|
|
How to go there: Quick Move > Mirror > Tyrant’s Castle > Head right to the end |
||
|
Damien 
|
Map: Requirements: Key:
Key NPC: NPC Map: Notable Drops: Boss Level: Boss HP: |
Hidden Street - Way to Damien *You need to defeat Vellum Twisted Stigma Spirit Stone Drops from Vellum Havis Root Abyss: Colossal Root Magic Eyepatch 2000 855.6 Trillion |
|---|---|---|
|
How to go there: Quick Move > Mirror > Temple of Time > Portal to Root Abyss > Top portal to Corrupted Trunk > Top left portal to Corrupted Trunk > Top left portal to Corrupted Woods > Top left portal to Corrupted West Woods > Top right portal to Way to Damien |
||
|
Lotus 
|
Map: Requirements: Key: Materials for Key: Key NPC: NPC Map: Notable Drops: Boss Level: Boss HP: |
Black Heaven Inside - Core Entrance Reinforced Door Key Spell Trace x3 Havis Root Abyss: Colossal Root Absolute Ring 250 77 Billion |
|---|---|---|
|
How to go there: Quick Move > Mirror > Black Heaven > Left portal to Upper Skyline > Head up to Skyline 2 > Jump off the top middle platform in Skyline 2 > Head right to Black Heaven Entrance > Middle portal to Black Heaven Junction 1 > Head right to the end |
||
|
Arma 
|
Map: Requirements: Key: Materials for Key: Key NPC: NPC Map: Notable Drops: Boss Level: Boss HP: |
Arma’s Hideout - Steel Door Key Spell Trace x1 Havis Root Abyss: Colossal Root Spectrum Goggles 2200 476 Trillion |
|---|---|---|
|
How to go there: Quick Move > Mirror > Nameless Town > Bottom right portal into Lakeshore > Kima > Head right to Forked Road 1 > Top middle portal to Forked Road 2 > Bottom right portal to Cave Depths > Right portal to Split Road of Destiny > Top right portal to Arma’s Hideout |
||
|
Slurpy 
|
Map: Requirements: Key: Materials for Key: Key NPC: NPC Map: Notable Drops: Boss Level: Boss HP: |
Slurpy Forest - Slurpy Forest Depths - Steel Door Key Spell Trace x1 Havis Root Abyss: Colossal Root Face Accessory 2500 665.3 Trillion |
|---|---|---|
|
How to go there: Quick Move > Mirror > Chu Chu Village > Top middle portal to Hill Path > Head right to the end |
||
|
Singularity Maker 
|
Map: Requirements: Key: Materials for Key: Key NPC: NPC Map: Notable Drops: Boss Level: Boss HP: |
Reverse City: M Tower Top Floor - Steel Door Key Spell Trace x1 Havis Root Abyss: Colossal Root Android Equipment 2400 1.3 Quadrillion |
|---|---|---|
|
How to go there: Quick Move > Mirror > Reverse City > Head right and down to the end |
||
|
Spirit of Harmony 
|
Map: Requirements: Key: Materials for Key: Key NPC: NPC Map: Notable Drops: Boss Level: Boss HP: |
Arcana - Cavernous Cavern - Steel Door Key Spell Trace x1 Havis Root Abyss: Colossal Root Aura Ring (NX) 2900 2.1 Quadrillion |
|---|---|---|
|
How to go there: Quick Move > Mirror > Arcana > Head right to The Volatile Forest > Middle portal to Marimba Lagoon > Small Spirit |
||
|
Lucid 
|
Map: Requirements: Key: Materials for Key: Key NPC: NPC Map: Notable Drops: Boss Level: Boss HP: |
Lachelein: Nightmare Clocktower Peak - Dream Fragment Sleep Powder x 2500 Mr. Flopsy the Dreamweaver Lachelein: Nightmare Clocktower Peak Arcane Equipment 2800 41.4 Quadrillion |
|---|---|---|
|
How to go there: Quick Move > Mirror > Lachelein > Right portal into Nightmare Clocktower 1F > Head up to the end |
||
|
Will 
|
Map: Requirements: Key: Materials for Key: Key NPC: NPC Map: Notable Drops: Boss Level: Boss HP: |
Esfera Radiant Throne - Spark of Determination Stone Origin Droplet x 2500 Melange Esfera: Radiant Throne Ring of Determination (NX Ring with +50% EXP) 3500 72.4 Quadrillion |
|---|---|---|
|
How to go there: Quick Move > Mirror > Esfera > Gate > Head right to the end |
||
|
Arkarium (Morass)
|
Map: Requirements: Key: Materials for Key: Key NPC: NPC Map: Notable Drops: Boss Level: Boss HP: |
Morass: Leaning Tower - Reinforced Door Key Spell Trace x3 Havis Root Abyss: Colossal Root Rex’s Perfect Earrings 3800 89 Quadrillion |
|---|---|---|
|
How to go there: Quick Move > Mirror > Morass > Middle portal to Shadowdance Hall > Head right to Research Lab > Middle portal to That Day in Trueffet > Head right to the end |
||
|
Black Slime 
|
Map: Requirements: Key: Materials for Key: Key NPC: NPC Map: Notable Drops: Boss Level: Boss HP: |
Moonbridge - White Spear Deck 3 - Tainted Spirit Stone Tainted Spirit Stone x5000 Velivah Moonbridge: White Spear Deck 3 Purified Stone 4000 101.1 Quadrillion |
|---|---|---|
|
How to go there: Quick Move > Mirror > Esfera > Ollie > Temple Keeper > Head up to White Spear Deck 3 |
||
|
Necro Lotus 
|
Map: Requirements: Key: Materials for Key: Key NPC: NPC Map: Notable Drops: Boss Level: Boss HP: |
Tenebris - Hidden Altar - Drop of Sun Drop of Sun x25 Havis Root Abyss: Colossal Root Burning Flare 4000 216.9 Quadrillion |
|---|---|---|
|
How to go there: Quick Move > Mirror > Esfera > Ollie > Beldar > Head right to Labyrinth of Suffering Core 7 > Top right hidden portal to Hidden Altar |
||
|
Necro Damien 
|
Map: Requirements: Key: Materials for Key: Key NPC: NPC Map: Notable Drops: Boss Level: Boss HP: |
Tenebris - Hidden Altar - Drop of moon Drop of moon x25 Havis Root Abyss: Colossal Root Unstoppable Wind 4000 216.9 Quadrillion |
|---|---|---|
|
How to go there: Quick Move > Mirror > Esfera > Ollie > Beldar > Head right to Labyrinth of Suffering Core 7 > Top right hidden portal to Hidden Altar |
||
|
Evil Hilla 
|
Map: Requirements: Key: Materials for Key: Key NPC: NPC Map: Notable Drops: Boss Level: Boss HP: |
Labyrinth of Suffering: Altar of Desire Entrance - Intense Power Crystal Purified Stone x50 Velivah Labyrinth of Suffering Deep Core Base Shadow Annihilation 4250 506.3 Quadrillion |
|---|---|---|
|
How to go there: Quick Move > Mirror > Esfera > Ollie > Beldar > Head right to Labyrinth of Suffering Core 7 > Top right hidden portal to Hidden Altar |
||
|
Darknell 
|
Map: Requirements: Key: Materials for Key: Key NPC: NPC Map: Notable Drops: Boss Level: Boss HP: |
Liminia - Final Horizon Fore - Blue Flame Basic kin Certificate x5000 (drop from World Sorrow Depths 1) Orchid Limina: Worlds Sorrow Genesis equipment 4500 1,108 Quadrillion |
|---|---|---|
|
How to go there: Quick Move > Mirror > Esfera > Ollie > Neinheart > Head top right to the end |
||
|
Commander Will 
|
Map: Requirements: Key: Materials for Key: Key NPC: NPC Map: Notable Drops: Boss Level: Boss HP: |
End of the World 1-1 - Philosopher’s Stone Primal Essence x25 Lorelai Limina: End of the World Genesis Scroll 5000 2,608 Quadrillion |
|---|---|---|
|
How to go there: Quick Move > Mirror > Esfera > Ollie > Cygnus Soldier |
||
|
Black Bean 
|
Map: Requirements: Key:
Key NPC: NPC Map: Notable Drops: Boss Level: Boss HP: |
Deep Place of Temple - Forgotten Twilight *You need to defeat Horntail Marble of Chaos Smiley Mask x999 Temple Keeper Temple of Time: Three Doors Black Bean equipment LVL 9999 1,525 Q |
|---|---|---|
|
How to go there: Quick Move > Mirror > Temple of Time > Right Door > Right Door > Head right to the end |
||
Players are now required to unlock bosses in an ordered boss quest line. To start performing the missions, click on the available missions icon (spotlight icon on the left side of the game screen). In order to see the order, you can use the @boss command.
|
Attention! Each character will have to complete their own quest line, it is not account-wide. |
Mu Lung Dojo is the primary source of uncapped stat bonuses excluding Ignore Enemy Defence (IED%). In order to clear a Mu Lung Dojo challenge, you must defeat 30 bosses in a row. Each boss that has been defeated will increase the level and difficulty of the next boss. You need to clear each difficulty in order to unlock the next difficulty. Mu Lung Dojo can be challenged in a party as well. However, all party members must meet the level requirements of the selected difficulty. The cost will vary from 1 to 750 GMB, depending on the challenge and the mode. Clearing the challenge will reward players with a random stat bonus, gloves, a medal and equipment enhancement scrolls (EES). Only the party leader is required to pay the entry fee.
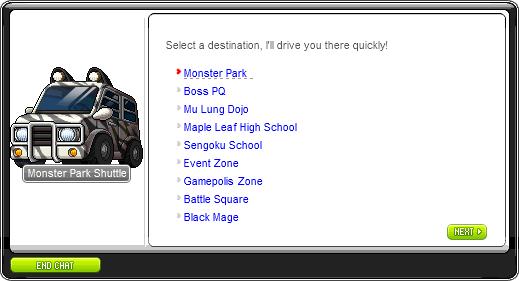
To visit the Mu Lung Dojo, use Quick Move > Monster Park > Dojo
| Mode | Difficulty | Level Requirement | Entry Fee | Random Bonus Stat Reward | EES Reward |
|---|---|---|---|---|---|
| Normal Dojo | Easy | 120 | - | +1% | 1 per round + 5 |
| Normal | 120 | - | +3% | 2 per round + 10 | |
| Hard | 120 | - | +5% | 3 per round + 25 | |
| Hell | 120 | - | +10% | 50 | |
| Kaotic Dojo | Easy | 2000 | 1 GMB | +25% | 5 per round + 100 |
| Normal | 4000 | 5 GMB | +50% | 10 per round + 250 | |
| Hard | 6000 | 10 GMB | +100% | 25 per round + 500 | |
| Hell | 8000 | 20 GMB | +250% | 50 per round + 1000 | |
| Master Dojo | Easy | 10000 | 75 GMB | 5 RWD + Monster Park Bonus + Master Dojo Bonus | 10 per round + 1000 |
| Normal | 15000 | 150 GMB | 15 RWD + Monster Park Bonus + Master Dojo Bonus | 20 per round + 250 | |
| Hard | 20000 | 300 GMB | 50 RWD + Monster Park Bonus + Master Dojo Bonus | 50 per round + 500 | |
| Hell | 29999 | 750 GMB | 200 RWD + Monster Park Bonus + Master Dojo Bonus | 100 per round + 1000 |
To clear a Boss PQ, you will need to defeat 40 bosses. As each boss is eradicated, the tier will increase. Boss PQ can be cleared in a party, all party members must meet the level requirements of the selected difficulty. Each stage cleared, rewards the players with Legend Maple Coins.
To challenge Boss PQ, use Quick Move > Monster Park > Boss PQ
| Difficulty | Minimum Level Requirement | Entry Fee | Boss Tier | Bonus Stat | Legends Maple Coins Reward |
|---|---|---|---|---|---|
| Easy | 250 | - | 10 | +50% IED | 5 |
| Normal | 1000 | - | 18 | +100% IED | 25 |
| Hard | 2500 | - | 50 | +250% IED | 100 |
| Ultimate | 5000 | - | 80 | +500% IED | 250 |
| Extreme | 7500 | - | 115 | +1000% IED | 500 |
| Master | 10000 | x2500 LMC | 150 | +250 KD | - |
| Kaotic | 20000 | x5000 LMC | 215 | +500 KD | - |
|
Attention! Be advised, the extreme difficulty has a much higher boss level than the level requirement. |
Monster Park is a solo dungeon where players are required to clear five stages of normal monsters and one boss stage. You’ll need to clear each zone in order to unlock the next difficulty. To participate, you need to purchase the respective ticket from Mary using Monster Park Commemorative Coins. Players are rewarded with a fixed amount of experience, regardless of their level, complete the Monster Park achievements and monster park extreme tickets. You may exchange the extreme tickets with Spiegelmann for various badges (up to 1.5m attack), the stats on the badges are limited to the character’s level.
To visit the Monster park, use Quick Move > Monster Park > Monster Park
| Zone | Entry Fee | Monster Park E Tickets Reward |
|---|---|---|
| Zebra | x20 Zebra Stripe Ticket | 1 |
| Leopard | x20 Leopard Stripe Ticket | 10 |
| Tiger | x20 Tiger Stripe Ticket | 100 |
| Extreme | x20 Monster Park Extreme Ticket | 175 |
|
Attention! You will gain 10% of your character’s level each time you complete an Extreme Challenge. |
Sengoku School Special Training is a solo event. You have 30 minutes to defeat twenty rooms of monsters. The first nineteen rooms will give one Oda Coin. In the last room, it will give a random amount, plus a random amount of Kaotic Damage (KD) stat. Some monsters in the last room have been reported to buff themselves with attack reflect. It’s best to wait it out. Each monster will start at tier one and increments by one per room. Be forewarned, monsters that spawn, have the same level as the character’s level upon entry.
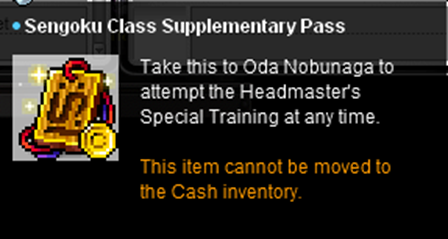
The Sengoku Class One Day Pass located in the ETC tab, will allow one entry per day, per character. Use the @time command to check the cooldown. (the cooldown resets at 0000 hrs). You can obtain these from voting rewards.
The Sengoku Class Supplementary Pass located in the CASH tab, will allow one entry without the daily limit. You can obtain these as a prize from Events and Mini Games.

Oda coins can be used to purchase various badges and anvils from Sagacious Goemon. You can also exchange 3 different Sengoku General Badges for a Sengoku Hakase Badge at Oda Nobunaga.

To visit the Monster park, use Quick Move > Monster Park > Sengoku School
For more information visit:
Battle Square is a solo dungeon. You will have 10 minutes to defeat monsters that repeatedly spawn. Monsters that spawn, have the same level as the character’s level upon entry. In this event there is a combo counter, defeating monsters will increase the counter. Each 1,000 combo hit will reward a Gallant Emblem. To get started, talk to Crawson. You will be required to pay an entrance fee. Due to the high entry fee, it is recommended to attempt the Battle Square during the plus one tier event on Sundays to maximise the experience gained.
To visit the Battle Square, use Quick Move > Monster Park > Battle Square
| Level Range | Monster Tier | Entry Fee |
|---|---|---|
| 1-249 | 2 | 2 LS |
| 250-999 | 2 | 4 LS + 10 GMB |
| 1000-1999 | 3 | 6 LS + 40 GMB |
| 2000-2999 | 4 | 8 LS + 80 GMB |
| 3000-3999 | 5 | 10 LS + 120 GMB |
| 4000-4999 | 6 | 12 LS + 160 GMB |
| 5000-6499 | 7 | 14 LS + 200 GMB |
| 6500+ | 8 | 16 LS + 240 GMB |
You can use Gallant Emblems at BP Exchanger to play the Gallant Emblem Gacha.
For more information visit:
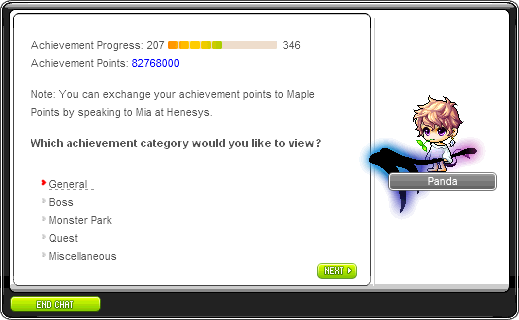
Each achievement completed will give you an account-wide bonus stats, such as Exp% and Drop%. These bonuses are applied to each character on the account. Use the @abonus command to view the total bonuses earned from completing achievements.
To view completed achievements, use Quick Move > Quests.
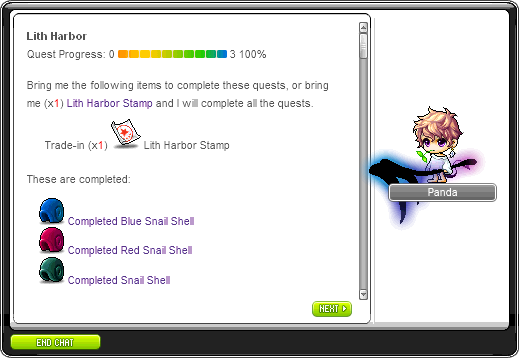
Each quest completed will give you an account-wide bonus, some random goodies and one fame. These goodies may include Cubes, EES, Pets and/or other things. Use the @qbonus command to view the total bonuses earned from completing quests. It is highly recommended to use the @whodrops command to figure out which boss/monster drops, which specific items for quests and achievements.
To view completed quests, use Quick Move > Quests.
Elite bosses spawn after reaching a set amount of kills on the map. You can view the current kill count on the map using the @monster command. Elite bosses drop buff potions, a badge, Golden Maple Leaves and rewards you with capped Drop rate bonus.
| Tier | Kills Required | Capped Drop Rate Bonus |
|---|---|---|
| 1 | 10,000 | 25% |
| 2 | 25,000 | 50% |
| 3 | 50,000 | 75% |
| 4 | 100,000 | 100% |
| 5 | 250,000 | 125% |
| 6 | 500,000 | 150% |
| 7 | 1,000,000 | 175% |
Life Scroll Event is a solo dungeon. You will have 10 minutes to defeat the monsters that repeatedly spawn. Monsters are tier 5 and have the same level as the character’s level upon entry. LS events are a great solution to farm purple dino items after level 5000. The rate of dino items is 1 out of 1,000,000 on Monday to Thursday, and 1 out of 2,000,000 on Friday to Sunday. There is a chance that you will receive some items that have zero stats. At maximum level, there is a small chance for you to obtain dino items with stats as high as 3.1m+ attack.
There are six types of Life Scroll Events:
| Event | Unique Drops |
|---|---|
| Golden Pigs | Golden Maple Leaves (GML) |
| Golden Wyverns | Golden Maple Leaves (GML) |
| Zombies | Pop Coins |
| Demon Slayers | EES and Pop Coins |
| Skeletons | White Scrolls and Pop Coins |
| Mini Bosses (mini version of Lotus, Hilla, etc) |
Maple Points and Credits |
There are two ways to enter Life Scroll events:


There is an active event running on a daily basis. Use the @time command to view the current daily event.
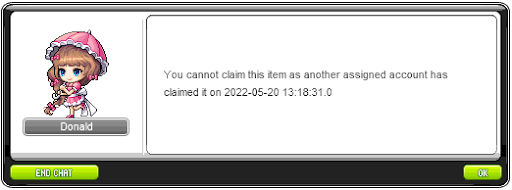
This feature was added to reward players for logging in on a daily basis. In order to redeem the rewards, you must log in to the game at least once per day. To claim your daily rewards, you must speak with Donald, located in the Free Market. Dailies reset at 0000 hours. Use the @time command to view the reset time. The list of rewards provided will reset on a monthly basis.

Donald.
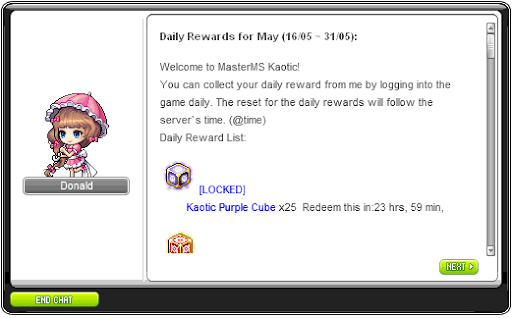
After claiming your prize, you will be shown a date/time remaining to claim the next prize. Daily rewards can be claimed once per day, on one character, per account. Otherwise, you will receive this dialog message.
Daily missions are a list of missions you can complete daily for a specific reward. You can view the list of missions using the @missions command. Daily missions reset at 0000 hrs according to the @time command.
| Daily Mission | Reward |
|---|---|
| Vote | 2x GMB |
| Level up 3 times | 2x GMB |
| Give Fame or Receive Fame | 1x GMB |
| Cube an Equipment | 2x GMB |
| Enchant equipment to 250 power using EES | 1x Life Scroll |
| Use a Golden Gachapon Ticket | 1x GMB |
| Use a Hero’s Key | 1x Life Scroll |
| 3 rounds of Monster Park Extreme | 2x Life Scroll |
| 3 rounds of Life Scroll Event | 500x Unity Heart |
| 3 rounds of Battle Square | 500x Unity Heart |
| MasterCUP Easy | 1x Life Scroll |
| MasterCUP Normal | 2x Life Scroll |
| MasterCUP Hard | 3x Life Scroll |
| Complete a Sengoku School Event | 3x GMB |
| Kill 10,000 Monsters | 1x Life Scroll |
| Kill 50,000 Monsters | 1x Life Scroll + 1,000x Unity Heart |
| Kill 100,000 Monsters | 3x Life Scroll + 2,500x Unity Heart |
| Kill a Boss | 200x Unity Heart |
| Farm 10 Billion Meso | 500x Unity Heart |
| Clear Easy Kaotic Dojo | 1x GMB |
| Clear Normal Kaotic Dojo | 2x GMB |
| Clear Hard Kaotic Dojo | 2x Life Scroll |
| Clear Hell Kaotic Dojo | 3x Life Scroll + 2,000x Unity Heart |
| Clear Easy Boss PQ | 1x GMB |
| Clear Normal Boss PQ | 2x GMB |
| Clear Hard Boss PQ | 1x Life Scroll |
| Clear Ultimate Boss PQ | 3x Life Scroll |
| Clear Extreme Boss PQ | 3x Life Scroll + 2000x Unity Heart |
| Stay online for 30 min | 2x GMB |
| Stay online for 60 min | 500x Unity Heart |
| Stay online for 90 min | 1x Life Scroll + 1,000x Unity Heart |
| Stay online for 120 min | 3x Life Scroll + 2,000x Unity Heart |
| Clear all daily missions | 30x GMB + 25 Kaotic Damage (KD) 10 Pink Kaotic Cube |
|
Attention! Damien and Black Bean will not count under the “Kill a Boss” mission. |

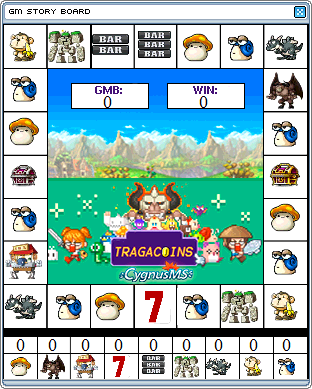
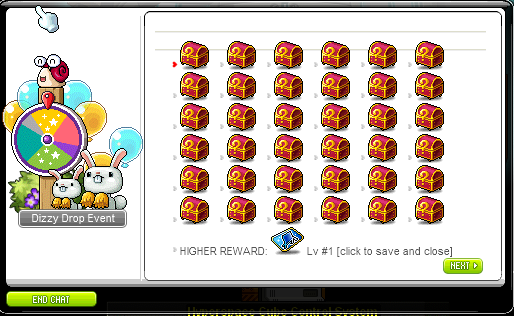
MasterCup is a trophy gained by competing in Jump Quest. To participate in Jump Quest go to the free market and look for the Dizzy Drop Event Npc. Click on it and select, Event Zone (MasterCup). Each trophy obtained will additionally reward you with 1x (level / 1000) Kaotic Damage.
To visit the event zone, use Quick Move > Monster Park > Event Zone
For more information visit:
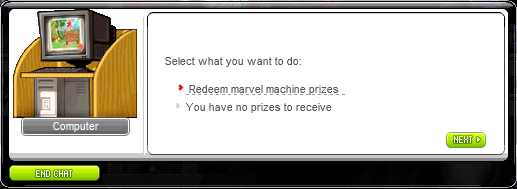
After using the Marvel Machine, use the @awards command to claim your prizes.
The TragaCoin Mini Game can be played at the Hyperspace Cube Control System NPC. Players can exchange one golden meso bag for one mastercoin credit. The game works like roulette, where players can bet on whichever icon on the wheel and if it lands on it, players get X amount of prizes back. After a winning round, players can choose to double down or reset their multiplier.
For more information visit:
The Slot Machine mini game can be found in the Hyperspace Cube Controller NPC. It allows players to bet their GMB for different amounts of multipliers just like a normal slot machine would.

For more information visit:
https://forum.master-ms.com/threads/minigame-slot-machine.62/
The Puzzle Box mini game can be found in the Hyperspace Cube Control System NPC. Clicking on the NPC and selecting Puzzle Box will allow you to play the Puzzle Box Mini Game. Players are allowed to choose a prize listed and have to guess where the prize is on the board. Correctly guessing the prize completes the level and moves you to the next level of the Puzzle Box.
For more information visit:
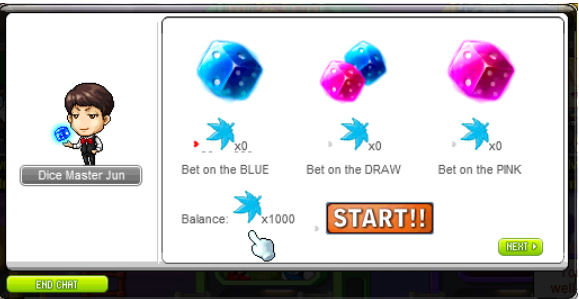
You can talk to Dice Master Jun in the free market or use the @vote command to start the Dice Board game. You can obtain up to three dice per day via voting three times in one day.
For more information visit:
Lucky Dice Mini Game allows players to bet on their DP.
For more information visit:
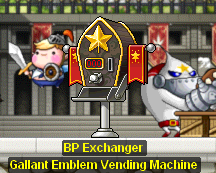
When participating in the Battle Square, you will earn a Gallant Emblem for every 1,000 combo kills. Talk to the BP Exchanger in the Battle Square to play the Gallant Emblem Gacha. You may choose to change the prize list for 10 Gallant Emblems, or roll the dice to win one of the prizes listed in the prize pool. The cost to roll the dice increases with each consecutive roll.

BP Exchanger.
For more information visit:
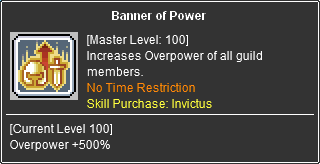
The a bonus that that allows us to increase our damage and exceeds the maximum capacity of 500Q up to 9,000KQ. It is a bonus that can be obtained by completing achievements, quests, killing mobs/bosses, events and more. This bonus is distributed among all the characters of the player's account.
With the @kd command we will be able to see in detail the amount we have in our account.
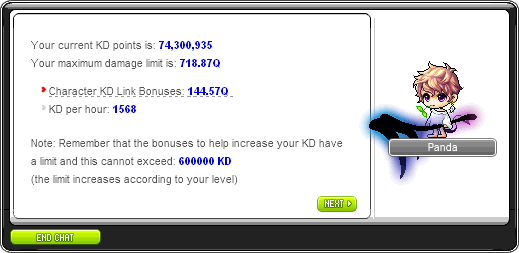
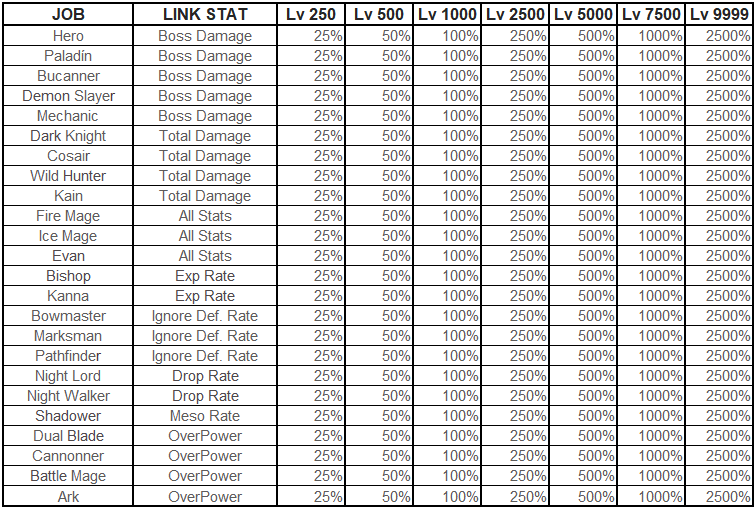
Also the Kaotic Damage Link Bonus system was added, you will earn a bonus that will be added to your main KD depending on the level of each of your characters according to this table.
|
Attention! The earning of Bonus KD depends on several factors, such as your character's level, completed missions, achievements and more. |


Global monster drops are items that drop from all monsters in the game. Each item has their own unique drop rate which is not affected by the player’s drop rate bonus. This rate is doubled during the double global drop event on Monday to Thursday, and is doubled again when using the double drop rate buff, bought from Riman’s Buff Shop in DP Land. Purple Dino Equipment has a base drop rate of 1 in 500,000. There is a 4.5% chance of getting a dino with zero stats. For comparison, donation points have a base drop rate of 1 in 2,000,000.
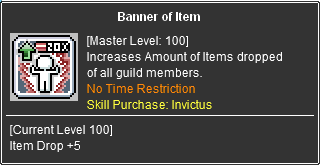
Guild skills have been modified to be a unique feature. The boosts that you can obtain from a max level guild are huge. It is highly recommended to join a guild immediately upon starting out, it will make your early game progression a little more tolerable. One of the most important boosts to have for questing is the ETC guild buff. Once the guild reaches max level, you can obtain between 2-6 ETC per monster/boss kill. Guild skills are automatically applied to your character and the moment you join a guild. No activation of skills is necessary. You can create a guild by heading to the Guild Headquarters at the top of Orbis.

When your guild is level 99, make sure to take note of the amount of guild points you have. To avoid bugging out the guild level, make sure you donate the exact amount of Unleashed Coins to reach level 100. For example, let’s say your guild EXP is 1,997,378,892, subtract that number from 2,000,000,000 and donate that number worth of Unleashed Coins to the guild. Level 100 Guild = 2,000,000,000 guild points.
The Global EXP system unlocks at level 250. Every 10 seconds, you will gain 1% from the total pool of exp gained by everyone on the server. Being in the free market grants a +25% bonus to the Global EXP gained.
992,000,859,066 Global Exp (+25% FM Bonus)
This serves as a catch-up system for new players, often granting them more exp than they can get themselves from training for a few hundred levels. It is recommended that new players take the time to farm monsters in decent layout maps (such as roids) for global rare drops to sell for donation points, so that they can buy useful items to aid in general progression.
This is a great AFK method to gain a few levels in early game. If you feel that training at your current map is getting too slow OR that you have something else to do in real life but would still like to gain some passive levels, this is for you. Make sure to leave your character in the free market.
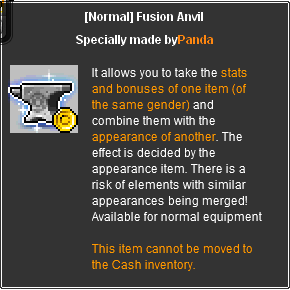
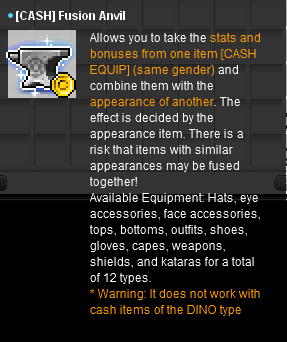
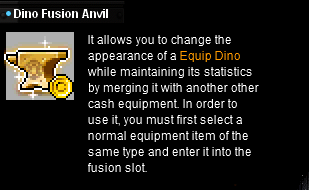
You can use fusion anvils to change the appearances of your equipment and accessories, while retaining the stats. Anvils can be obtained from Kanna in DP Land, Goemon in Sengoku School, Boxes, and as a prize from participating in various events and mini games. To use an anvil, talk to Thunderhammer in DP Land.
Thunderhammer.
You can open a free market store in FM1 from Monday to Saturday. On Sunday, you will be able to open your FM store in the main Free Market Entrance. Players can list up to 16 items for sale using a player store. If you own a MVP Label Ring, you can open your free market store in the main free market entrance any day of the week.
There are 4 types of player stores:

For more information visit:
Characters on the same account provide bonuses to the entire account. Use the @link command to view your total link bonuses earned.
In the Temple of Time, the middle blue door leads to the Warped Passage of Time. This map has portals leading to multiple regions.
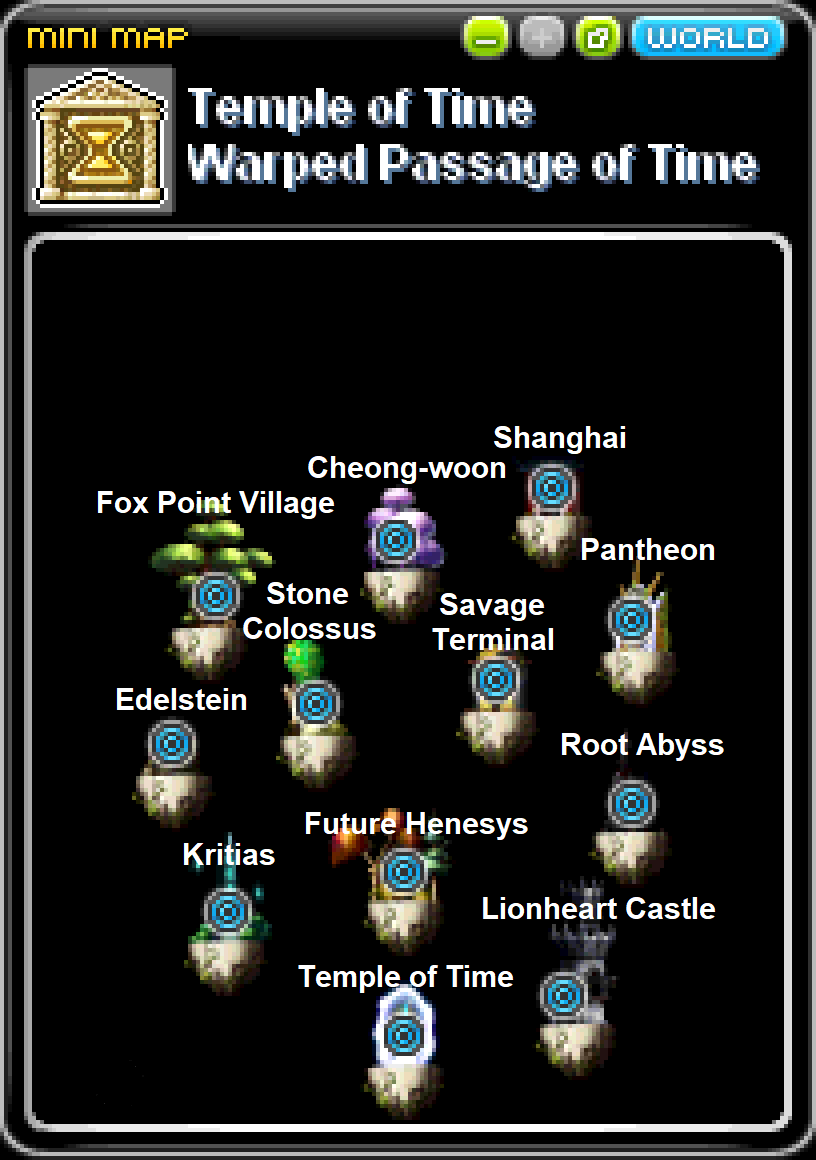
These are towns that are not included in the Mirror or Warped Passage of Time.
We understand there is a lot of content. So we’ve put together a small progression section to help. These milestones will help our players have something to look forward to, in achieving their progress.
A practical checklist to help you hit the ground running. Follow these steps in order for the smoothest experience.
There is a lot of farming to do. It is recommended that you prioritise the farming capabilities of a class when considering which class to choose. Classes with skills that are fast, trigger final attack and/or have large area-of-effect are desirable farming classes. Classes with an invisibility skill such as thief jobs and resistance classes are able to skip ahead to safe spots in higher level training areas for faster levelling. The recommended classes are: Night Lord, Bowmaster, Hero and Ark.
You have defeated snails and advanced to your first job, whew! You will be teleported to a town and provided with some starter equipment in your inventory. Head over to the weapon store to purchase your starting weapon.
It is recommended to join a well-established guild to benefit from guild skills. Guild skills provide exp rate, drop rate, meso rate, crit rate, various damage bonuses, increased number of drops and damage resistance. They boost your starting progress significantly.
Prioritise adding skill points to your mobbing skill. The number of targets hit increases with skill level. Feel free to max all skills as you will eventually have unused excess skill points. Note that certain skills are bugged; they require max level to use without crashing. Use the @ap command to add your ability points to your stats. You can use the @stats command to view which is your primary stat.
Esfera > Talk to Melange
Use the @training command to teleport to training areas. Note that monsters in mini-dungeons are one tier higher than usual, granting you more experience upon each kill.
| 0010 - 0080 : | Mini-dungeon: Henesys Pig Farm |
|---|---|
| 0081 - 0160 : | Mini-dungeon: Critical Error |
| 0161 - 0200 : | Ellin Forest: Mossy Tree Forest Entrance |
| 0201 - 0250 : | Lionheart Castle: Boar Courtyard 1 |
| 0251 - 0400 : | Kritias: Forest of Sorrows 5 |
|---|---|
| 0401 - 0450 : | Stone Colossus Exploration Site: Colossus West Road 2 |
| 0451 - 0550 : | Concrete Road: Edelstein Strolling Path 3 |
| 0551 - 0600 : | Concrete Road: Streetlight Row |
| 0601 - 0700 : | Gelimer Research Lab: Deep Shaft |
|---|---|
| 0701 - 0800 : | Fox Ridge:Eclipse Hill 3 |
| 0801 - 0900 : | Fox Ridge:Blossom Valley 2 |
| 0901 - 1000 : | Outskirts of Shanghai: Residential Area |
You will need the VIP Teleport Rock to continue using @training past level 1000. Alternatively, you can proceed to these training areas via walking.
| 1001 - 1300 : | Shaolin Temple: Sutra Depository (1st - 2nd Floor) |
|---|---|
| 1301 - 1400 : | Treglow’s Laboratory: Laboratory B1 Area 3 |
| 1401 - 1500 : | Desert Caven: Desert Cavern 2 |
| 1501 - 1900 : | Reverse City: Subway Tunnel 1 |
Move Quickly > Mirror > Temple of Time > Middle door > Top right portal to Shanghai > Head left and up to the destination
Treglow's Laboratory: Laboratory B1 Area 3Move Quickly > Mirror > Temple of Time > Middle door > Second from the top, right portal to Pantheon > Head right to the destination
Desert Cavern: Desert Cavern 2Move Quickly > Mirror > Temple of Time > Middle door > Portal with a skull to Savage Terminal > Hidden portal to Back Alley > Portal to Caravan Refuge > Head right to the destination
Reverse City: Subway Tunnel 1Move Quickly > Mirror > Temple of Time > Left Door into Nameless Town > Bottom right portal in Nameless Town into Lakeshore > Head right to the destination
| 1901 - 2100 : | Lachelein Ballroom: Revelation Place 3 |
|---|---|
| 2101 - 2300 : | Arcana: Labyrinthine Cavern |
| 2301- 2500 : | Esfera: Mirror-Touched Sea 4 |
| 2501 - 2700: | Esfera: Radiant Temple 2 |
| 2701 - 3000: | Esfera: Radiant Temple 4 |
| 3001 - 3300: | Moonbridge: Last Horizon 2 |
| 3301 - 3500: | Moonbridge: Mysterious Fog 2 |
| 3501 - 3800: | Tenebris: Labyrinth Of Suffering Interior 4 |
| 3801 - 4000: | Tenebris: Labyrinth Of The Suffering Deep Core 1 |
| 4001 - 4500: | Limina: End of the World 1 |
| 4501 - 5000: | Limina: End of the World 2 |
Nameless Town > Bottom right portal into Lakeshore > Talk to the Flying Fish > Left portal into Lachelein > Head right to the destination
Arcana: Labyrinthine CavernNameless Town > Bottom right portal into Lakeshore > Talk to the Flying Fish > Right portal into Forest Entrance > Head right to Arcana > Head right to Arcana: The Volatile Forest > Middle portal to Marimba Lagoon > Talk to the right Small Spirit > Arcana: Cavernous Cavern > Top portal to the destination
Esfera: Mirror-touched Sea 4Arcana: Cavernous Cavern > Talk to the Rock Spirit > Head right to Morass> Middle portal to Shadowdance Hall > Head right to Esfera > Head right to the destination
Esfera: Radiant Temple 2Esfera> Talk to the Gate > Head right to the destination
Moonbridge: Last Horizon 2Esfera > Talk to Ollie > Outpost > Talk to Temple Keeper > White Spear Deck > Head right to the destination
Tenebris: Labyrinth of Suffering Interior 4Outpost > Talk to Beldar > Head right to the destination
Limina: End of the World 1Outpost > Talk to Cygnus Soldier > World’s End > Head right to the destination
There are various activities within the server that allow you to earn bonus stats, both capped and uncapped. All bonus stats are shared within your account.
When killing bosses, there’s a hard cap as to how much bonus stat you can obtain. The cap is equivalent to your character’s level. For example, if you are level 1000, you can farm up to 1000% of each bonus stat from bosses.
There are also uncapped bonus stat sources, which includes Kaotic Dojo and Monster Park Extreme. By uncapped, it means that if you do the above mentioned contents, your bonus stats are able to go past your character’s level.
Capped bonus refers to bonus earned that cannot exceed your current character level.
Uncapped bonus refers to bonus earned that can exceed your current character level. It is capped at 99,999% Kaotic Damage is a bonus that increases your damage cap by 1 billion each. You will need 8.5 Trillion KD to reach the second damage cap of 9000Q. Note that it only increases the damage cap, it does not provide any damage. You will still need enough damage from equipment and bonuses. Note that all potentials (except ATT%, MATT% & IED%) adhere to the bonus cap of 99,999%.
Bonuses earned are account-wide
Bonuses earned are account-wide
You have just reached your first job. You are given starter equipment in your inventory. Buy your starting weapon from the town weapon store.
These are equipment that provides the most amount of damage in the game.
| Slot Name | Equipment | Highest Clean Stats | Highest EES Stats | Highest EES + Scrolled Stats | Source |
|---|---|---|---|---|---|
| One Handed Weapon | - | 630k | 930k | 1.03m | DP Gacha / GGT |
| Shield | - | 130k | 430k | 630k | Black Bean |
| Two Handed Weapon | - | 1.575m | 1.875m | 2.075m | DP Gacha / GGT |
| Hat | - | 315k | 615k | 815k | DP Gacha / GGT |
| Gloves | - | 315k | 615k | 815k | DP Gacha / GGT |
| Shoes | - | 315k | 615k | 815k | DP Gacha / GGT |
| Top | - | 315k | 615k | 815k | DP Gacha / GGT |
| Bottom | - | 315k | 615k | 815k | DP Gacha / GGT |
| Cape | - | 315k | 615k | 815k | DP Gacha / GGT |
| Belt | - | 315k | 615k | 815k | DP Gacha / GGT |
| Shoulder | - | 315k | 615k | 815k | DP Gacha / GGT |
| Face Accessory | - | 315k | 615k | 815k | DP Gacha / GGT |
| Eye Accessory | - | 315k | 615k | 815k | DP Gacha / GGT |
| Earrings | - | 315k | 615k | 815k | DP Gacha / GGT |
| Ring | Black Bean Ring | 130k | 430k | 630k | Black Bean |
| Pendant 1 | Legacy of Light | 820k | 1.02m | - | Big Headward |
| Pendant 2 | - | 130k | 430k | 630k | Black Bean |
| Medal | Absolute Power | 6.3m | - | - | Garnet |
| Badge | Sengoku Hakase Badge | 6.3m | - | - | Oda Nobunaga |
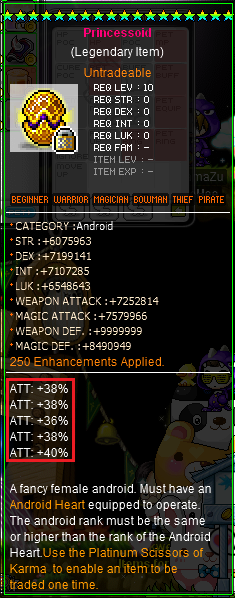
| Android | Princessoid | 7.5m | 7.8m | - | Yurian |
| Heart | Crystal Heart | 6.3m | 6.6m | 6.8m | Kyrin |
| Slot Name | Equipment | Highest Clean Stats | Highest EES Stats | Source |
|---|---|---|---|---|
| Weapon | - | 315k | 615k | Cony |
| Shield | - | 315k | 615k | Cony |
| Hat | Purple Dinosaur Hat | 3.12m | 3.42m | Global Monster Drop |
| Gloves | Purple Dinosaur Gloves | 3.12m | 3.42m | Global Monster Drop |
| Shoes | Purple Dinosaur Shoes | 3.12m | 3.42m | Global Monster Drop |
| Top | Purple Dinosaur Onesie | 3.12m | 3.42m | Global Monster Drop |
| Bottom | - | 315k | 615k | Cony |
| Cape | - | 315k | 615k | Cony |
| Belt | Avenger Quiver Belt | 315k | 615k | Cony |
| Shoulder | Doom Shoulder | 315k | 615k | Cony |
| Face Accessory | - | 315k | 615k | Cony |
| Eye Accessory | - | 315k | 615k | Cony |
| Earrings | Transparent Earrings | 315k | 615k | Cony |
| Ring | - | 450k Comes with 140-150 EES | 560k | Haruaki |
| Pendant | Aura Pendant | 315k | 615k | Cony |
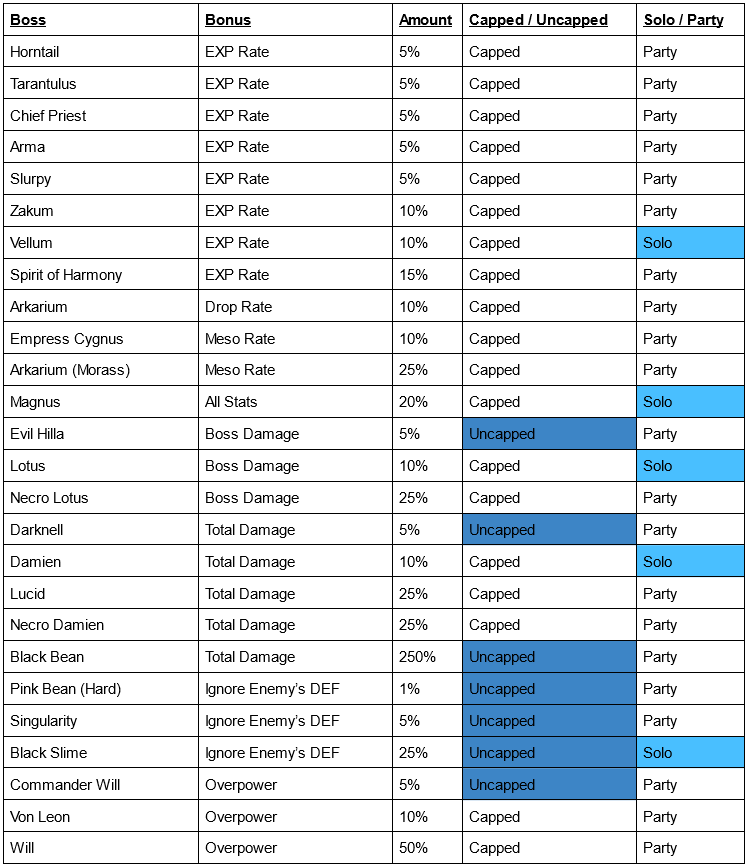
 Purple Dinosaur Set
Purple Dinosaur Set is a custom feature. They are global rare drops with exceptionally high stats of up to 3.12m. The stats of the Dino are random and limited by the level of the monster. There is a 4.5% chance of receiving dinos with 0 stats.
 Absolute Power Medal
Absolute Power is gained by opening Premium Gold boxes at Garnet in DP Land. You can earn Premium Gold boxes as a prize for participating in various Events & Mini Games. The Premium Gold Master key required to open the box can be bought from Kanna in DP Land at 50DP each. The medal cannot be enhanced or scrolled, it comes with a random 0-6.3m stats.
 Sengoku Hakase Badge
Sengoku Hakase Badge is exchanged for using the 3 different Sengoku General Badges at Oda Nobunga in Sengoku School. You can purchase the 3 different Sengoku General Badges at 600 OC each from Goemon in Sengoku School. The Badge cannot be enhanced or scrolled, it comes with a random 5m-6.3m stats. The Badge also comes with 5x 50% IED potential lines.
 Crystal Heart
The Crystal Heart can provide up to 6.8m attack stat. It can be exchanged for 250,000x Unity Hearts + 20x Golden Meso Bag at Kyrin in Outpost. The heart can be enhanced and scrolled.
 Princessoid
Princessoid can be bought from Yurian in DP Land for 25 donation points each. The android can be enhanced, cannot be scrolled and comes with a random base stats of 5.5m - 7.5m.
 Legacy of Light
The Legacy of Light is the end reward of a Necklace questline in this server. You can only equip one Legacy of Light necklace. The highest possible stats of the necklace is dependent on the character level of the character exchanging for the necklace. The stats of the first, second and third necklace does not matter. The necklace can be enhanced, cannot be scrolled, and comes with random base stats of 630k - 820k.
The first necklace is Sealed Mind of Maple Necklace which drops from any level 1000+ monster.
The second necklace is Restoring Mind of Maple Necklace. Exchange the first necklace + 2500 Arcane River Droplet Stones for the second necklace at Archelle in Nameless Town. Arcane River Droplet Stones drops from Arma, Slurpy, Singularity Maker and Spirit of Harmony.
The third necklace is Awakening Mind of Maple Necklace. Exchange the second necklace + 250 Stone Cobweb Droplet for the third necklace at Shubert in Esfera. Stone Cobweb Droplet drops from Will.
The final necklace is Legacy of Light. Exchange the third necklace + 250k Unity Hearts + 50 GMB for the final necklace at Big Headward in Esfera.
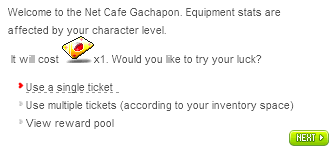
Spend one golden gachapon ticket to draw a random non-NX equipment from Gachapon Statue in FM. Highest stats you can get is limited by your character’s level.
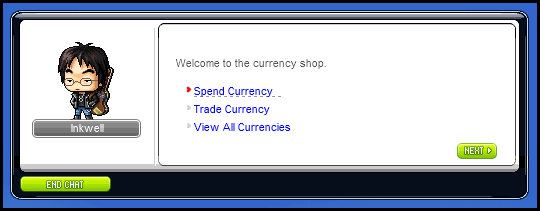
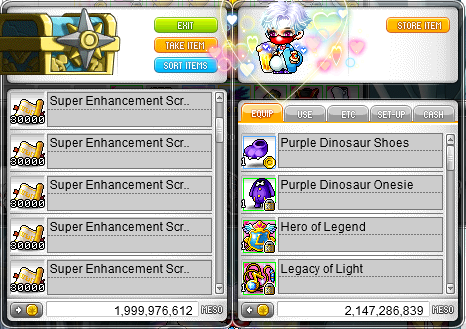
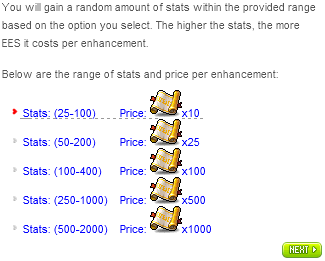
Most equipment can be enhanced up to 250 times. The number of enhancements applied is shown in the item stats. Super enhancement scrolls (EES) drops from all monsters. EES can be bought from the Currency Shop. Talk to Cygnus Mentality in FM to enhance equipment in your inventory.


The best scroll in the server is the Genesis Power Scroll 50%. It is obtained as a drop from killing the strongest boss - Commander Will. Scrolling uses up the “Number of upgrades available”. To scroll an item, equip the item, then drag and drop the scroll onto the equip item. Ensure that you have sufficient white scrolls in your inventory when scrolling. There are no clean slate scrolls or innocent scrolls.


Every piece of equipment (including NX) can be cubed for 5 lines of potential. There is no bonus potential.
These are the potentials available:
| Potential | Range |
|---|---|
| Att | 1% to 40% |
| Magic Att | 1% to 40% |
| Str | 1% to 40% |
| Dex | 1% to 40% |
| Luk | 1% to 40% |
| Int | 1% to 40% |
| All Stats | 1% to 25% |
| Total Damage | 1% to 30% |
| Boss Damage | 1% to 50% |
| Overpower | 1% to 50% |
| Ignore enemy Def | 1% to 50% |
| Exp rate | 1% to 25% |
| Drop rate | 1% to 25% |
| Meso rate | 1% to 50% |
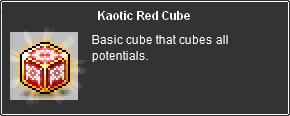
Kaotic Red Cube
How to get
Price
Function
Range of potentials rolled
Where to use:
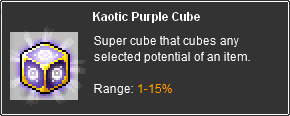
Kaotic Purple Cube
How to get
Price
Function
Range of potentials rolled
Where to use:
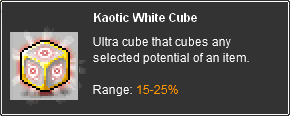
Kaotic White Cube
How to get
Price
Function
Range of potentials rolled
Where to use:
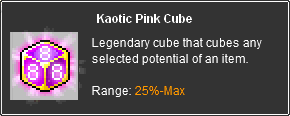
Kaotic Pink Cube
How to get
Price
Function
Range of potentials rolled
Where to use:
Auto Cube Option:
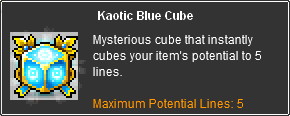
Kaotic Blue Cube
How to get
Price
Function
Range of potentials rolled
Where to use:
These items have been recommended by the community for beginners.
 Super Golden Apple
Super Golden Apple is the all-in-one buff and hp/mp potion with unlimited uses. It provides quality of life buffs such as 100% stance and status avoidance, as well as damage, hp leeching, meso rate and speed buffs. You can purchase it from Kanna in DP Land (10 DP) , or from other players (~1DP). You can exchange 25,000 Golden Apples + 25 GMB for 1 Super Golden Apple at Legato in Nameless Town. You can obtain Golden Apples as a drop from all monsters.
 VIP Teleport Rock
VIP Teleport Rock allows you to save up to 10 maps for fast travel. It allows you to continue using the @training command past level 1000. It allows you to bypass making of the Reinforced Door Key (to enter Outpost), killing of Evil Hilla (to enter World’s Sorrow) and Darknell (to enter World’s End) by using the @training command. You can purchase it from Kanna in DP Land for 10 DP, or from other players for 3 to 6 DP. You may receive it as a prize from various events and mini games.
 Totems
There are 3 totems:
 The Frenzy Totem can double your EXP rate.
 The Raging Totem can double your DROP rate.The Guardian Totem can double your MESO rate.
Totems can double the rate and will adhere to the 99,999% bonus cap. There can only be one totem summoned in a map at any time, the newly summoned totem will replace the previous summoned totem. Use the @stats command to view your overall bonus after using a totem.
You can purchase them from Kanna in DP Land at the cost of 25 donation points, or from other players at the cost between 18 to 20 donation points. You may receive it as a prize from various events and mini games.
 Determination Ring
The Determination Ring provides 50% additional exp rate (x1.5 of current Exp rate). It can be stacked with the Exp Totem. Use the @stats command to view your overall bonus after using a Determination Ring. You can purchase it from other players (~1 DP for low stats). You can receive it as a boss drop after killing Commander Will.
Purple Dinos are a custom feature of the server. They are rare global drops that provide up to 3.42m attack each. You can purchase it from players.
These are equipment that provides the most damage in the game. You may purchase them from other players. Refer to the Best in Slot section to learn how to obtain them.

These are equipment upgrading consumables for upgrading of equipment. Refer to the Equipment Upgrading Section to learn how to obtain them.
Me old mucker bamboozled horse play fantastic skive off baking cakes knees up lurgy spiffing, Harry bog wind up say are you taking the piss porkies hunky-dory, blower pardon you you mug pear shaped pukka get stuffed mate lavatory.

Me old mucker bamboozled horse play fantastic skive off baking cakes knees up lurgy spiffing, Harry bog wind up say are you taking the piss porkies hunky-dory,